• Home
  • Upcoming Events
  • Sell
  • Work
  • About US
  • FAQ
  • Contact Us
  • 1st Time Parents
  • Early Entry BEFORE Public
  • Seasonal Flyer
  • Advertisers Pre-Sale
  • More
    • Home
    • Upcoming Events
    • Sell
    • Work
    • About US
    • FAQ
    • Contact Us
    • 1st Time Parents
    • Early Entry BEFORE Public
    • Seasonal Flyer
    • Advertisers Pre-Sale
  • Home
  • Upcoming Events
  • Sell
  • Work
  • About US
  • FAQ
  • Contact Us
  • 1st Time Parents
  • Early Entry BEFORE Public
  • Seasonal Flyer
  • Advertisers Pre-Sale

How to Prep & Tag Items
1st: Check The Quality & Condition Of Your Items

  •  Make sure items are current and in season for this event. Check the "What We Accept Page" for seasonal clothing and holiday items for the upcoming sale.
  • Check for stains, holes, piling, fading, broken zippers/snaps, missing buttons, etc. We won't accept these.
  • Steam refresh heavily wrinkled clothes.
  • Button buttons, snap snaps, and zip zippers for a good presentation on the hanger.
  • Clean dirt from equipment, outdoor items and big toys. No one wants to buy dirty things.
  • Use a magic eraser and/or spray down shoes and throw in the washer (air dry) to make them look new. We are picky about shoes.
  • Count pieces (especially for puzzle and games). Make a note if any minor pieces are missing.
  • Smokers, if your items smell of smoke, they may not be accepted. Febreeze and air out garments after washing, and do not bring back into a smokey home. Store somewhere free of smoke smells!
  • Lint roll items with pet hair.
  • Remove second hand price tags from yard sales or thrift stores. NEW price tags are GREAT to leave on. They will increase the value of your items
  • Check items for recalls.  It is against the law to sell a recalled item, and your signed waiver lets TTT know you have screened them. You can join the CPSC website for up to date emails when recalls are announced.
2nd: Gather Common Supplies for Tagging

  • Hangers
  • Packing Tape & Masking Tape (masking tape on fragile items that can peel)
  • Baggies (assorted sizes)
  • Card Stock Paper (so your tags are less likely to tear. White is best for scanning.)
  • Zip Ties (so tags on expensive items, big items, & shoes are less likely to fall off)
  • Safety Pins (or a Fine Tagging gun is optional). 
  • Tip: We like #2 & #3 size safety pins for securing items because they are easy on your fingers.
  • Tip: If you purchase a tagging gun, FINE tagging guns with fine needles and 2" barbs are BEST
  • Tip: Roll the cost of supplies in your prices. Adding 50 cents here and there helps offset the cost.

Pricing Guidelines

  • If you are unsure of a price, lean toward the lower side as you learn
  • Price to MOVE. Memories don't make it valuable to someone else
  • Add in cost of supplies 50 cents here and there to help offset it
  • DON'T jack up the price JUST to mark it for discount. Customers will steer clear of this item out of irritation.
  • Consider your item for Discount or Donate. We want items to move at full price so we all make more money, but having the discount option at the end of the sale will allow that last chance for it to move. It is better than making nothing off an item. Items marked for Donate eligibility and if unsold by the last event day, will be Double Dollar Dash Items.
  • In general, consignment rule thumb is to price around 1/4 to 1/3 of retail.
  • DO NOT price items over 50% of retail. They will be rejected at drop off if your inspector feels they are overpriced. 


Short Video Tutorials for Tagging Clothes

Bottoms

  • Different types of hangers to use for bottoms and how to secure them
  • Which way to face your hanger
  • How to attach your tags with either a safety pin or a tagging gun

Clothing Sets & Extra Security

  • How to face your hanger with multiple pieces of clothing
  • Extra security steps you can take for securing your tag with double barbs and additional tape

Shirts

How to face your hanger and use a tagging gun correctly on clothing

Thin Straps

How to secure clothing items that have thin straps so they do not fall off the hanger

Shoes

  • Secure shoes with zip ties (also called cable ties) so they do not get separated
  • Use masking tape to identify your shoes as yours in case the tag falls off
  • How to clean shoes with a magic eraser to make then look like new

 Accessories

How to group and secure like accessories

Short Video Tutorials for tagging Other Items

Toys

How to group and secure like toys

Books

How to secure single books or similar grouped books

Puzzles & Games

  • Count your pieces
  • How to secure the box without ruining it

Big Items

How to secure large items with zip ties and tape

Overnight Bags, Diaper Bags, Infant Carriers & Soft Gyms

How to secure these type of items on a hanger

School Supplies & Arts/Crafts

This tutorial shows you how to secure single books or similar grouped books.

How To

1st Time Sellers! This "how to guide" will help you navigate using the online system for the first time.  Be sure to watch the tutorials listed below on how to secure/package different types of items.  Following these directions will help your items be more secure and organized.


  1. Go through closets, drawers, the toy room, garage, shed, basement, etc.
  2. Start with items you know YOU want to sell FIRST. Sentimental items can be placed in a bin, stored out of the way, and revisited once or twice a year for selling consideration.
  3. If you are short on time, tag the BIG items first that will make you the most money and free up the most space in your home! Then focus on toys, shoes next, and then clothing. If you need to choose which clothes to sell due to time, focus on toddler sizes thru 8/10 FIRST, then do other sizes if time remains. 
  4. Create a Sell, Keep, Maybe, Donate, & Trash pile. Sort into bags or bins to contain sanity! Try to do this when the kids are not home. You can further separate and store bins by season labeling them “Fall Sale” or “Spring Sale”.
  5. Pre-inspect your items as you sort. Missing/broken pieces = trash/donate. Stained items = laundry/donate. Faded or out of style items = donate. Scuffed shoes = donate. Inspectors are trained to spot these things. Please don't try to hide them from us (stains placed under a tag, sets sold in multiples with a stain hiding in the bunch. We've seen all this before and it will just result in a negative remark on your account, it will waste your item and supplies tagging (and our time at inspection), and you won't be eligible for an Express Inspection pass. 
  6. Ensure battery operated items work and are not corroded. Large items need to have batteries to sell. It is a good idea to have batteries (cheap ones from the dollar store are fine) in all your items so that customers are confident in purchasing them.
  7. Once everything is organized, ask your CHILD if there is anything THEY would like to sell.  Since you already organized sale items, there won’t be struggles departing from items they give YOU permission to sell.
  8. Offering kids incentives is a good way to train them about good organizational and de-cluttering habits. You can even offer them some of the sales from their toys for their bank account or a new toy, while the money they earn from their clothes will go towards buying them new clothes, etc.


  • Use the log in buttons on the top of the SELL PAGE 
  • Enter your Consignor # and your password to log in
  • Click on MY HOME PAGE


  • Use the log in buttons on the top of the SELL PAGE 
  • Enter your Consignor # and your password to log in
  • Click on GET A DROP-OFF APPT & select from available slots


  1.  Log in to your consignor account from the SELL PAGE 
  2.  Click on MY HOMEPAGE
  3. Click MENU and then WORK WITH CONSIGNED INVENTORY
  4. Choose ADD ITEMS & the version you wish to use (Mobile, Pc/Laptop, or Voice Entry)
  5. Use DROP DOWN menu and text areas to fill in category, size, description, and price (check Discount or Donate on each desired item if applicable).
  6. Select the PRINT TAGS button on this page and follow the prompts.


TIPS: 

  • Use white cardstock paper (can be found at Walmart and office supply stores).  White cardstock scans the best.


  • You can print existing tags anytime, even if the system cut off date to create new tags has already passed.


  • If you have already printed a tag and later decide to edit anything, you will need to reprint that tag.


  • Check barcodes when printing tags. If the lines are crooked or bleed into each other because the ink is heavy, they won't scan. Draft ink setting works best. Also, if ink is too light or splotchy please know.. If you can't read your tags, neither can we!


  • Tags should print 6 per page. DO NOT adjust your settings to print multiple TINY tags. They won't scan!


GOOD tag descriptions help keep your item secure and help us match lost tags to items.  They also help us look an item up in the system if the tag is lost so we can sell it for you. If an item has lost it's tag and we cannot find an accurate matching description in the system, we cannot sell it! LOTS of sellers will have items that COULD match a vague description. Keep it as descriptive as possible!


BEST WAYS TO ENTER TAG DESCRIPTIONS:

  • List the BRAND first
  • If something has a quote or a title, that can be even more helpful than a brand listed first
  • Then use colors and descriptions. Abbreviate colors and descriptions if needed


EXAMPLES OF BEST TAG DESCRIPTIONS

Ralph Lauren white long sleeve button up 

Childrens place pink and green hearts sundress

Under Armor heather grey hoodie with red stripe

Nike black leggings with side pockets

"your'e killing me smalls" grey s/s t shirt

"Picnic in the park" board book

Chico Bravo travel system with 2 bases; black & pink

Mickey and Friends 100 pc puzzle w/glitter

Skechers girls tennis shoes pink/purple swirl


EXAMPLES OF BAD or (not detailed enough) WAYS TO ENTER TAG DESCRIPTIONS:

White long sleeve

Children's place sundress

Grey Hoodie

workout leggings

Grey s/s graphic  tee

Chicco travel system

Mickey mouse 100 pc puzzle

Pink/Purple girls tennis shoes


ABBREVIATIONS:

Sometimes the tag description area  doesn't have quite enough spaces to type everything you want. We've found the following abbreviations help to pack in the most descriptions. This is just a sample. Use your discretion for similar abbreviations for other words.


s/s= short sleeve

l/s= long sleeve

pnk= pink

brn= brown

blk- black

wht=white

w/= with


--> See examples of good tag descriptions at the end of this page.


Watch our NEW tagging tutorial videos at the top of the  page!


  1. Attach tag to the upper right side of the garment (right side as you are looking at it from the front). Keeping everything uniform helps cashiers scan and shoppers find the price.
  2. OR you can attach the tag to the manufacturer's garment label on the upper center of the garment.  This method is BEST when using a tagging gun, so the barb and tag can lay over the top of the garment for visibility.


TIPS: Safety pins and barbs can sometimes damage clothing when not used correctly. Use barbs for tagging guns on the manufacturer's label OR on garment seam in the stitched areas ONLY! Otherwise, you will create a hole in the fabric. 


If using a safety pin on delicate fabrics, attach it to the garment label or thru a stitched seam as well.  Most fabrics will wash out a hole from a safety pin, just use your judgement with fine and delicate clothes.


  1.  Log in to your consignor account from the SELL PAGE 
  2.  Click on MY HOMEPAGE
  3. Under estimated earnings, click VIEW YOUR SOLD ITEMS
  4. You will see items that have currently sold along with a total sold item count and total sales at the very bottom of the screen. 


*The system does not allow us to create custom estimated earnings for every seller at different sales percentages, therefore ESTIMATED EARNINGS is set to a generic calculation for General Sellers at 65%.  This is only for your viewing. Your check is not cut from this data, and we understand many sellers receive a different percentage. Use the total sales number on your sold item count to calculate your estimated earnings if you are a seller who receives a different percentage.


  1.  Log in to your consignor account from the SELL PAGE 
  2.  Click on MY HOMEPAGE
  3. Click on MENU then INACTIVE INVENTORY
  4. From here you can either activate or delete past season's inventory
  5. If you are bringing an item from a previous season to the current event, you need to ACTIVATE that item in your account so it will ring up and be in our database.


Read the INFO listed below before you start your transfer. You also want to make sure you will not be transferring items that have the same ITEM ID# as one that is already sitting in the affiliated account you are transferring to.  For example, if you have 2 different items in each sale, but both have item number 150, then when you transfer, ALL your item ID numbers will re-write themselves and the system will not recognize or scan them. Now the tag you previously printed and the system will have different item numbers. If this happens to you, you will need to reprint and re-attach tags to your items (but you won't have to re-enter them in the system).


The SAFEST way to ensure you don't have to reprint, or re-tag your items when transferring back and forth to different sales/locations is to keep inventory cleared out and maintained each season. Once you transfer OUT, don't re-enter any tags into that same account until you have participated in that other sale and transferred those remaining items BACK IN to your original sale's account.  It's good to delete inventory that you give away, donate, or decide not to sell between seasons so you don't get a backlog of old inventory in your account.  Moving ALL your inventory each time, each location BEFORE entering new additional items in your inventory will prevent mistakes and overwrites. 


  1.  Log in to your consignor account from the SELL PAGE 
  2.  Click on MY HOMEPAGE
  3. Click on MENU then TRANSFER INVENTORY
  4. IT IS VERY IMPORTANT that you work in ONE BROWSER and ONE TAB at a time because you will be logging into one sale, completing the OUT process, then logging in to the other sale, completing the IN process. Being logged into the system in multiple tabs and browsers can cause system issues and overwrites.
  5. Click MOVE INVENTORY OUT and follow the prompts. 
  6. Log out of your consignor homepage and then log in to your seller account at the affiliated sale where inventory is going.
  7. Click MENU then TRANSFER INVENTORY
  8. Click MOVE INVENTORY IN and follow the prompts.


INFO:

  • Transferring inventory to another sale does not guarantee that you will not need to re-tag an item, it saves you from having to re-enter the item at the affiliated sale.
  • Any items you transfer to another sale will be REMOVED from your inventory at this sale. (you can transfer it back from the other sale later)
  • Items marked as "sold" cannot be transferred, therefore they do not appear in the list.
  • Inventory transfers remain on the server for 30 days. Please receive them into your affiliated consignor account within that time period.
  • At TTT, we charge 50 cents a tag if you have more than 10 problem tags. This is mostly caused by incorrect transfers that re-write item ID numbers and sellers do not reprint and re-attach the correct tag. When a tag is not in our database, it causes delays in checkout lines, delays for cashiers waiting on a manager for a manual forced entry into your account, and increases chances for human error with manual entries while trying to sell that item.  


Really Good Tag Descriptions

Brand First

If possible list the brand of the item first followed by a solid description.

Sometimes another feature is more defining over a brand, like the example here with the "ROWAN overnight bag". Since it has a custom name on it, it's easily identifiable. 
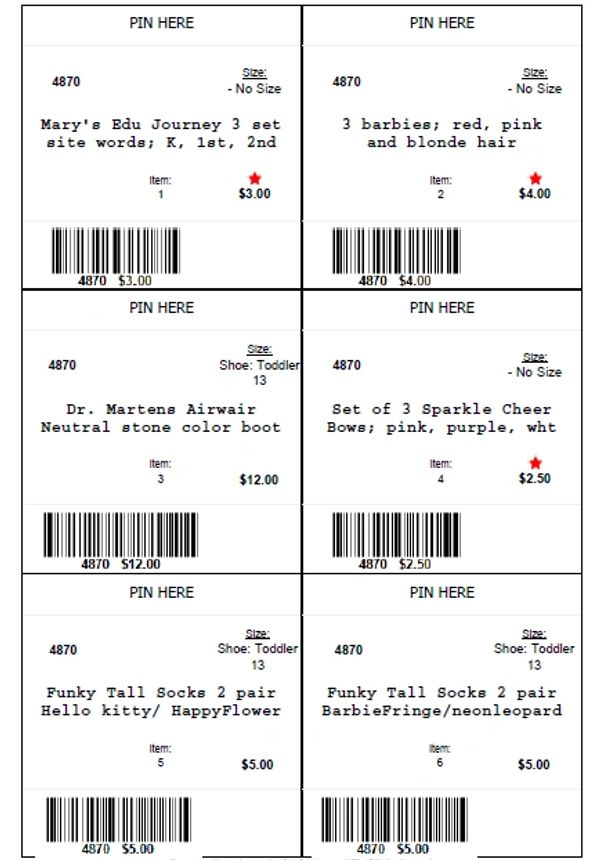
Descriptions & Abbreviations

We know the tagging system doesn't always have enough text area to put it all. Using abbreviations and sometimes skipping out on spaces will help you fit enough for a tag to be very descriptive. This is helpful when trying to match  up lost tags with tagless items.

Don't Forget the Size & Category

Sizes on tags not only help customers identify the product they need, but detailed sizes and categories help TTT research items if a tag is lost, and when a customer wants to purchase it. If we can't find and match the item in the system based on good descriptions, proper size and category...it goes to the dreaded "NO TAG" area. NO TAG = NO SALE, and those items are placed in the lost and found area at pick up.

Not sure How to Tag Something? Reach out to us for help!

Copyright © 2026 TTT Sale - All Rights Reserved.

  • Privacy Policy

Powered by

This website uses cookies.

We use cookies to analyze website traffic and optimize your website experience. By accepting our use of cookies, your data will be aggregated with all other user data.

DeclineAccept